Getting Started with CH32V003: Difference between revisions
Jump to navigation
Jump to search
| (44 intermediate revisions by 2 users not shown) | |||
| Line 1: | Line 1: | ||
After watching | After watching David Jones's YouTube "EEVblog 1524 - The 10 CENT RISC V Processor! CH32V003",<br> | ||
https://www.youtube.com/watch?v=L9Wrv7nW-S8&ab_channel=EEVblog<br> | https://www.youtube.com/watch?v=L9Wrv7nW-S8&ab_channel=EEVblog<br> | ||
I had to learn more about this chip. | I had to learn more about this chip. | ||
==Dallas Makerspace Workshop, Wednesday, Sept 25th, 7-9PM== | |||
For those who have signed up for the CH32V003 Workshop, '''Welcome !''' | |||
I have already heard from some of you, and I'm getting excited to see what I can learn as well. | |||
Some of you have already installed the tools, and are programming your CH32V003 boards with | |||
example code, installing command-line example, learning what happens when you attempt a 32-bit | |||
read on an unaligned boundary, and making code comments. Thank you for the interaction! I love it! | |||
'''If possible, please spend a little time downloading the tools and example code:''' | |||
'''IDE:''' http://www.mounriver.com/ | |||
'''LinkE Software:''' https://www.wch.cn/downloads/WCH-LinkUtility_ZIP.html | |||
'''Example Code:''' https://github.com/wuxx/nanoCH32V003 | |||
'''OR:''' https://github.com/openwch/ch32v003/tree/main/EVT/EXAM | |||
==The CH32V003 microcontroller== | |||
32-bit RISC-V core - 48MHz operating frequency | |||
2KB SRAM | |||
16KB program FLASH | |||
System power supply: 3.3V or 5V | |||
Factory-trimmed 24MHz RC oscillator (HSI) | |||
DMA, ADC (8 external, 2 internal signals), 2 Timers, USART, | |||
I2C, SPI, up to 18 GPIOs | |||
The 20-pin '''CH32V003F4U6''' is $0.15 in "onesie-twosie" quantities. | |||
The 8-pin '''CH32V003J4M6''' is available for $0.10. | |||
'''Data Sheet:''' https://github.com/wuxx/nanoCH32V003/blob/master/doc/CH32V003DS0_EN.PDF | |||
'''Reference Manual:''' https://github.com/wuxx/nanoCH32V003/blob/master/doc/CH32V003RM_EN.PDF | |||
'''Instruction Set:''' https://riscv.org/wp-content/uploads/2017/05/riscv-spec-v2.2.pdf | |||
==Where to get a CH32V003 development board== | ==Where to get a CH32V003 development board== | ||
I ordered | I ordered five development kits (Nano Dev board, LinkE programmer, USB cable) for $53.18 in April, 2023, from aliexpress.com. | ||
https://www.aliexpress.us/item/ | I obtained another four kits from a coworker. Sorry, this kit is no longer available. | ||
Amazon will sell these development boards and LinkE boards for $10 (or more) each. | |||
aliexpress.com will sell these development boards for $1. The WCH-LinkE boards run $5.45. | |||
My favorite development board includes a CH340 USB-Serial chip on-board. (I REALLY like this feature!) | |||
https://www.amazon.com/CH32V003-Development-Minimum-Interface-fepart303799/dp/B0CSJYQ94L/ref=sr_1_3 | |||
I don't like the price the seller is asking. Search AliExpress for better pricing... | |||
https://www.aliexpress.us/item/3256805693233146.html | |||
Repository for board with documentation and example code: https://github.com/wuxx/nanoCH32V003 | Repository for board with documentation and example code: https://github.com/wuxx/nanoCH32V003 | ||
The github repo's '''README.md file:''' https://github.com/wuxx/nanoCH32V003#readme | The github repo's '''README.md file:''' https://github.com/wuxx/nanoCH32V003#readme | ||
'''Schematic:''' https://github.com/wuxx/nanoCH32V003/blob/master/hardware/nanoCH32V003.pdf | |||
I created a RISC-V folder under Documents like so: | I created a RISC-V folder under Documents like so: | ||
| Line 18: | Line 55: | ||
Inside the "doc" folder is the zipfile, CH32V003EVT.ZIP, with "EVT" folder inside. | Inside the "doc" folder is the zipfile, CH32V003EVT.ZIP, with "EVT" folder inside. | ||
Unzip the EVT folder into "doc", so you have the example code available. | Unzip the EVT folder into "doc", so you have the example code available. | ||
This zip file was provided by WCH, providing examples for the CH32V003, | |||
not specifically for the nanoCH32V003 board. | |||
Github Examples: https://github.com/openwch/ch32v003/tree/main/EVT/EXAM | |||
==MounRiver Studio IDE== | ==MounRiver Studio IDE== | ||
| Line 24: | Line 65: | ||
==More info concerning the board== | ==More info concerning the board== | ||
According to the schematic, the LED is connected to PD6 | |||
'''If using the GPIO example project, need to change source code to use PD6, not PD0.''' | |||
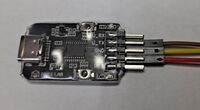
==WCH-LinkE v1.0== | |||
After plugging in the WCH-LinkE USB-Serial programmer, the device should display in Window Device Manager | |||
[[File:WCH_Link_Device_Manager.jpg|right|300px]] | |||
[[File:WCH-LinkE front.jpg|200px]] | |||
[[File:WCH-LinkE back.jpg|200px]] | |||
The programmer comes with a 4-conductor cable, wire colors: brown (1), red (2), orange (3), yellow (4) | |||
I connected the LinkE programmer to the nanoCH32V003 target board as follows: | |||
'''Target LinkE''' | |||
GND - brown - GND | |||
DIO - yellow - SWDIO | |||
3V3 - red - 3V3 | |||
NOTE: | |||
The LinkE programmer includes a USB-Serial adapter to send/receive USART data to/from | |||
your development board to/from your host computer. I recommend TeraTerm for a terminal emulator. | |||
https://teratermproject.github.io/index-en.html | |||
==WCH-Link Utility== | |||
This software tool connects with the WCH-LinkE programmer, and allows the user to read, write, examine | |||
program data written to the RISC-V device. | |||
https://www.wch.cn/downloads/WCH-LinkUtility_ZIP.html | |||
==Building "Blinky" using MounRiver Studio== | |||
1) Unzip/install CH32V003EVT.ZIP discussed earlier. This provides our Software Development Kit (SDK). | |||
2) Within MounRiver Studio, select: | |||
File->Load->Navigate to the unzipped SDK->EVT\EXAM\GPIO\GPIO_Toggle\GPIO_Toggle.wvproj | |||
Click "OK" | |||
The project will display within MounRiver Studio's Project Explorer | |||
3) Configure the output GPIO of choice.... (The default may not be your LED pin) | |||
Edit User->main.c->GPIO_Toggle_INIT() | |||
Change "GPIO_Pin_6" to be the pin number of choice | |||
[[File:EditPin.jpg|400]] | |||
Change "GPIOD" to be the port letter of choice | |||
[[File:EditPort.jpg|400]] | |||
Edit User->main.c->main() function, editing the port and pin within GPIO_WriteBit() call. | |||
[[File:GPIO WriteBit.jpg|400]] | |||
4) Click the "Build" button | |||
[[File:MounRiver_Icon_Build.jpg|100px]] | |||
5) Click the "Download" button | |||
[[File:MounRiver_Icon_Download.jpg|100px]] | |||
If "Download" has trouble finding the .hex file, see "Create Intel Hex output files" below. | |||
Hopefully, if all goes well, the moon is in the correct position, | |||
and you're holding your tongue correctly, the LED on your development board will blink as programmed. | |||
==Create Intel Hex output files== | |||
Here's how you instruct MounRiver Studio to create Intel Hex output files: | |||
1) Right-click on the project within the Project Explorer | |||
2) Select Properties | |||
[[File:GPIO Toggle Select Properties.jpg|200px]] | |||
3) Navigate to C/C++ Build -> Settings -> GNU RISC-V Cros Create Flash Image -> General. | |||
Using pull-down menu, select "Intel HEX(.hex)" | |||
[[File:Flash_Image_Intel_HEX.jpg|200px]] | |||
4) Click on "Apply and Close" | |||
==Enable/Display MounRiver Studio's Built-in Terminal== | |||
1) Select Window->Show View->Other | |||
[[File:WindowShowViewOther.jpg|200]] | |||
2) Select Show View->Terminal->Terminal | |||
[[File:ShowViewTerminalTerminal.jpg|200]] | |||
3) After the Terminal view appears, select the "Open a Terminal" icon at the top of the Terminal view | |||
[[File:TerminalIcon.jpg|200]] | |||
4) Configure the terminal as needed. | |||
Select the Serial port | |||
Select the Baud rate | |||
Click "OK" - You should be good to go | |||
Note: This terminal has NO FEATURES.. | |||
No line termination support. | |||
No ANSI color support.. | |||
==Notes & References== | ==Notes & References== | ||
| Line 30: | Line 141: | ||
compatible with the STM8S003F3, https://www.st.com/resource/en/datasheet/stm8s003f3.pdf, at 1/3rd the price. | compatible with the STM8S003F3, https://www.st.com/resource/en/datasheet/stm8s003f3.pdf, at 1/3rd the price. | ||
The UFQFPN20 package doesn't appear to be pin compatible. | The UFQFPN20 package doesn't appear to be pin compatible. | ||
'''Other websites for the CH32V003:''' | |||
https://www.cnx-software.com/2023/02/22/ch32v003-risc-v-mcu-gets-1-5-development-board-open-source-gcc-toolchain-and-flasher-utility/ | |||
https://hackaday.com/2023/03/02/a-ch32v003-toolchain-if-you-can-get-one-to-try-it-on/ | |||
https://github.com/AlexanderMandera/arduino-wch32v003 | |||
https://www.tindie.com/products/adz1122/ch32v003-risc-v-mcu-development-board/ | |||
Example code provided by the processor manufacturer: http://www.wch.cn/downloads/CH32V003EVT_ZIP.html | |||
https://www.wch.cn/downloads/file/409.html | |||
guide: https://pallavaggarwal.in/2023/09/20/ch32v003-programming-guide/ | |||
guide: https://community.element14.com/technologies/embedded/b/blog/posts/low-cost-microcontrollers-using-a-ch32v003-risc-v-device | |||
I2C Assembly Example: https://github.com/IanWraith/CH32V003-RISC-V-Assembly-Examples/blob/main/i2c.s | |||
I2C Example using AT24C256 EEPROM - Link: | |||
https://pallavaggarwal.in/2023/10/05/ch32v003-programming-i2c-eeprom/ | |||
==My CH32V003 Projects== | |||
Currently storing my CH32V003 projects on github: | |||
1us Timer : https://github.com/JimMerkle/CH32V003_Timer_1us | |||
command_line: https://github.com/JimMerkle/CH32V003_command_line | |||
I2C Read/Write w DS3231: https://github.com/JimMerkle/CH32V003_I2C_7bit | |||
Latest revision as of 16:21, 3 October 2024
After watching David Jones's YouTube "EEVblog 1524 - The 10 CENT RISC V Processor! CH32V003",
https://www.youtube.com/watch?v=L9Wrv7nW-S8&ab_channel=EEVblog
I had to learn more about this chip.
Dallas Makerspace Workshop, Wednesday, Sept 25th, 7-9PM
For those who have signed up for the CH32V003 Workshop,  Welcome !
I have already heard from some of you, and I'm getting excited to see what I can learn as well.
Some of you have already installed the tools, and are programming your CH32V003 boards with
example code, installing command-line example, learning what happens when you attempt a 32-bit
read on an unaligned boundary, and making code comments. Thank you for the interaction! I love it!

If possible, please spend a little time downloading the tools and example code:
IDE: http://www.mounriver.com/
LinkE Software: https://www.wch.cn/downloads/WCH-LinkUtility_ZIP.html

Example Code: https://github.com/wuxx/nanoCH32V003
OR: https://github.com/openwch/ch32v003/tree/main/EVT/EXAM
The CH32V003 microcontroller
32-bit RISC-V core - 48MHz operating frequency
2KB SRAM
16KB program FLASH
System power supply: 3.3V or 5V
Factory-trimmed 24MHz RC oscillator (HSI)
DMA, ADC (8 external, 2 internal signals), 2 Timers, USART,
I2C, SPI, up to 18 GPIOs
The 20-pin CH32V003F4U6 is $0.15 in "onesie-twosie" quantities.
The 8-pin CH32V003J4M6 is available for $0.10.

Data Sheet: https://github.com/wuxx/nanoCH32V003/blob/master/doc/CH32V003DS0_EN.PDF
Reference Manual: https://github.com/wuxx/nanoCH32V003/blob/master/doc/CH32V003RM_EN.PDF
Instruction Set: https://riscv.org/wp-content/uploads/2017/05/riscv-spec-v2.2.pdf
Where to get a CH32V003 development board
I ordered five development kits (Nano Dev board, LinkE programmer, USB cable) for $53.18 in April, 2023, from aliexpress.com.
I obtained another four kits from a coworker.  Sorry, this kit is no longer available.
Amazon will sell these development boards and LinkE boards for $10 (or more) each.
aliexpress.com will sell these development boards for $1.  The WCH-LinkE boards run $5.45.

My favorite development board includes a CH340 USB-Serial chip on-board. (I REALLY like this feature!)
https://www.amazon.com/CH32V003-Development-Minimum-Interface-fepart303799/dp/B0CSJYQ94L/ref=sr_1_3
I don't like the price the seller is asking.  Search AliExpress for better pricing...
https://www.aliexpress.us/item/3256805693233146.html

Repository for board with documentation and example code: https://github.com/wuxx/nanoCH32V003
The github repo's README.md file: https://github.com/wuxx/nanoCH32V003#readme
Schematic: https://github.com/wuxx/nanoCH32V003/blob/master/hardware/nanoCH32V003.pdf

I created a RISC-V folder under Documents like so:
C:\Users\Jim\Documents\RISC-V

While inside the RISC-V folder, I cloned the repository like so:
 git clone https://github.com/wuxx/nanoCH32V003.git

Inside the "doc" folder is the zipfile, CH32V003EVT.ZIP, with "EVT" folder inside.
Unzip the EVT folder into "doc", so you have the example code available.
This zip file was provided by WCH, providing examples for the CH32V003,
not specifically for the nanoCH32V003 board.

Github Examples: https://github.com/openwch/ch32v003/tree/main/EVT/EXAM
MounRiver Studio IDE
Download the latest version of MounRiver Studio IDE from the official website:
http://www.mounriver.com/  and install it.
More info concerning the board
According to the schematic, the LED is connected to PD6
If using the GPIO example project, need to change source code to use PD6, not PD0.
WCH-LinkE v1.0
After plugging in the WCH-LinkE USB-Serial programmer, the device should display in Window Device Manager

The programmer comes with a 4-conductor cable, wire colors: brown (1), red (2), orange (3), yellow (4)
I connected the LinkE programmer to the nanoCH32V003 target board as follows:
Target         LinkE
GND  - brown  - GND
DIO  - yellow - SWDIO
3V3  -  red   - 3V3


NOTE:
The LinkE programmer includes a USB-Serial adapter to send/receive USART data to/from
your development board to/from your host computer.  I recommend TeraTerm for a terminal emulator.
https://teratermproject.github.io/index-en.html
WCH-Link Utility
This software tool connects with the WCH-LinkE programmer, and allows the user to read, write, examine
program data written to the RISC-V device.
https://www.wch.cn/downloads/WCH-LinkUtility_ZIP.html
Building "Blinky" using MounRiver Studio
1) Unzip/install CH32V003EVT.ZIP discussed earlier. This provides our Software Development Kit (SDK). 2) Within MounRiver Studio, select: File->Load->Navigate to the unzipped SDK->EVT\EXAM\GPIO\GPIO_Toggle\GPIO_Toggle.wvproj Click "OK" The project will display within MounRiver Studio's Project Explorer 3) Configure the output GPIO of choice.... (The default may not be your LED pin) Edit User->main.c->GPIO_Toggle_INIT() Change "GPIO_Pin_6" to be the pin number of choiceChange "GPIOD" to be the port letter of choice
Edit User->main.c->main() function, editing the port and pin within GPIO_WriteBit() call.
4) Click the "Build" button
5) Click the "Download" button
If "Download" has trouble finding the .hex file, see "Create Intel Hex output files" below. Hopefully, if all goes well, the moon is in the correct position, and you're holding your tongue correctly, the LED on your development board will blink as programmed.

Create Intel Hex output files
Here's how you instruct MounRiver Studio to create Intel Hex output files: 1) Right-click on the project within the Project Explorer 2) Select Properties3) Navigate to C/C++ Build -> Settings -> GNU RISC-V Cros Create Flash Image -> General. Using pull-down menu, select "Intel HEX(.hex)"
4) Click on "Apply and Close"


Enable/Display MounRiver Studio's Built-in Terminal
1) Select Window->Show View->Other2) Select Show View->Terminal->Terminal
3) After the Terminal view appears, select the "Open a Terminal" icon at the top of the Terminal view
4) Configure the terminal as needed. Select the Serial port Select the Baud rate Click "OK" - You should be good to go Note: This terminal has NO FEATURES.. No line termination support. No ANSI color support..


Notes & References
As noted in the YouTube EEVblog, the TSSOP20 package for this part appears to be pin
compatible with the STM8S003F3, https://www.st.com/resource/en/datasheet/stm8s003f3.pdf, at 1/3rd the price.
The UFQFPN20 package doesn't appear to be pin compatible.
Other websites for the CH32V003:
https://www.cnx-software.com/2023/02/22/ch32v003-risc-v-mcu-gets-1-5-development-board-open-source-gcc-toolchain-and-flasher-utility/
https://hackaday.com/2023/03/02/a-ch32v003-toolchain-if-you-can-get-one-to-try-it-on/
https://github.com/AlexanderMandera/arduino-wch32v003
https://www.tindie.com/products/adz1122/ch32v003-risc-v-mcu-development-board/
Example code provided by the processor manufacturer: http://www.wch.cn/downloads/CH32V003EVT_ZIP.html
https://www.wch.cn/downloads/file/409.html
guide: https://pallavaggarwal.in/2023/09/20/ch32v003-programming-guide/
guide: https://community.element14.com/technologies/embedded/b/blog/posts/low-cost-microcontrollers-using-a-ch32v003-risc-v-device
I2C Assembly Example: https://github.com/IanWraith/CH32V003-RISC-V-Assembly-Examples/blob/main/i2c.s

I2C Example using AT24C256 EEPROM - Link:
https://pallavaggarwal.in/2023/10/05/ch32v003-programming-i2c-eeprom/
My CH32V003 Projects
Currently storing my CH32V003 projects on github:
1us Timer : https://github.com/JimMerkle/CH32V003_Timer_1us
command_line: https://github.com/JimMerkle/CH32V003_command_line
I2C Read/Write w DS3231: https://github.com/JimMerkle/CH32V003_I2C_7bit